


DIY Transformer Costume - How I Turned My Kid Into a Transformer (And Somehow Survived to Tell the Tale)
- Oct 20, 2025
- 5 min read
Updated: Mar 22
You know those Pinterest moms who build entire Halloween masterpieces out of cardboard and a single glue stick, while their house smells like cinnamon brooms and success? Yeah… I’m not her.
But this year, my daughter said the six words no parent is ever truly ready for: “Mom, I want to be a Bumblebee Transformer.” Cue the dramatic music, the cardboard avalanche, and the mild identity crisis that comes when you realize you’re about to engineer a small vehicle.
DIY Transformer Costume: The Vision
I started with what every DIYer starts with; blind optimism and zero structural experience. I'm not sure if any other DIYer also failed geometry ahem twice, but I also wear that badge of dishonor. I'm not proud of the fact that my brain literally shuts down the minute it hears numbers, but for some reason I continue to attempt things that very much involve said numbers and I'm happy to have found little ways to work around my math shortcomings.
And, despite feeling overwhelmed at the idea that my daughter specifically said she wanted a costume that transforms, I also wanted this costume to be epic: foam edges, shiny vinyl, the works. The kind of costume that makes other parents whisper, “Wait… did she really make that or did her husband?" No, Karen. I built it in my kitchen with a utility knife and caffeine-fueled confidence.
The Materials
Here’s what I used (and what I now know I’ll find in random corners of my house until next Halloween):
Cardboard boxes (thank you, shopping addiction)
1 sheet of foam insulation (optional!} If you want to make the quick version, just skip the foam and continue on to build the rest just as if it was cardboard.
Yellow, black & silver heavy duty duct tape
Black, yellow and silver vinyl wrap. You can sub these for paint or duct tape. In fact, I highly suggested swapping out the vinyl for semi or high gloss paint and only use the vinyl for the stripes.
Hot glue gun + glue sticks (so many glue sticks)
Medium Grit Sanding Pad (you can skip if you aren't using foam)
Scissors: I'm going to link the ones that I used because I LOVE them. They cut through everything with ease and I realized that I've been missing out for years using the cheapos.
Reflective Tape (optional but perfect for nighttime trick-or-treating.
A stubborn streak and a dream
The Process
You can watch the full step-by-step build in my YouTube tutorial, but here’s the short version: I measured my daughter while she lay in the crouched “car mode” position — which, if you’re wondering, is as weird as it sounds. I had a very large box from a TV we bought for our outdoor kitchen that I used for most of it, but I thanked my shopping addiction for the other boxes that I had on hand. If you only have small boxes, I recommend cutting them down, lining them up and using duct tape to make them bigger. Once I got her measurement length x height (head to heels and hands to head) I added a few inches extra in front of her head and behind her feet because kids tend to grow fast and I didn't want my costume to cause her claustrophobia.
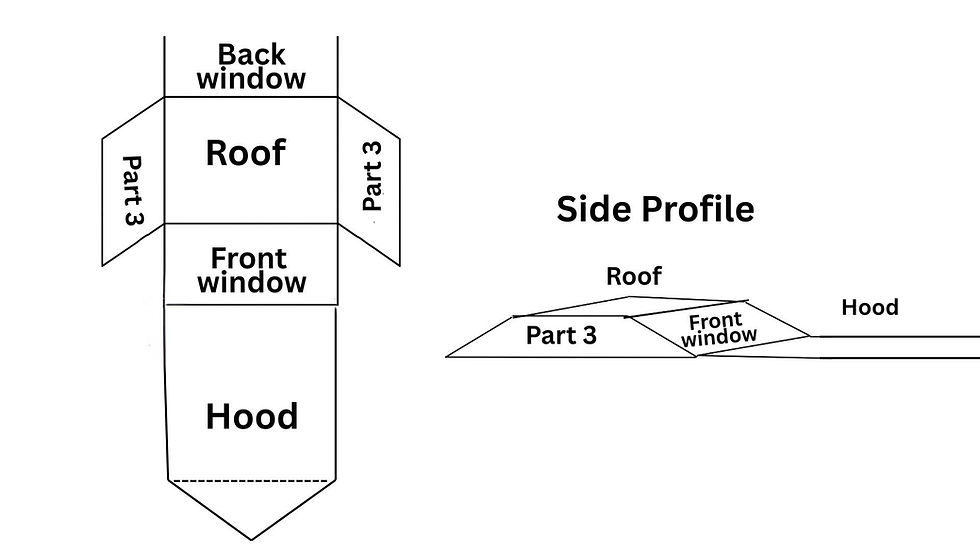
I drew the car freehand looking at a toy camero she had. I had her trace over that with marker and then we cut the pieces out with a utility knife. We then traced those pieces to make the same pieces for the other side of the car and I labeled them "Part 1", "Part 2" and "Part 3" because I'm original like that. I highly suggest either painting or vinyling (is that a word?) each piece before you put them together. I then traced the cardboard pieces onto the foam insulation board that I had and cut those pieces out using a utility knife.
Next, I used spray adhesive to attach the cardboard to the foam and I used scissors and a medium grit sanding block to shape and smooth out all of the edges of each piece of foam.
If you want to make a much quicker and still impressive and transformable version of this costume that would take you max 2 hours, skip the foam part altogether! I envy the moms who will choose that version. But, I'm an overachiever and I make everything way more complicated than it needs to be.
As I state in the video, I enjoyed making the wheels and decorating it the most. There were moments of glory (when the vinyl went on smooth) and moments of chaos (when the vinyl did not go on smooth). I burned my fingertips, swore allegiance to duct tape, and questioned every life choice that led me here. But, when we strapped the final piece on and she transformed … it was pure movie magic.
My daughter and I usually dress up for Halloween together as a little tradition and every year we make an Instagram reel. Even though I envisioned myself as Optimus Prime, I also knew that I couldn't mentally get through another costume, so I threw on some leather for our annual Instagram Halloween reel and I told my daughter, "I'm Mikaela Banes". For those who don't know, Mikaela was played by Megan Fox in Transformers 1 (2007) and Transformers 2: Revenge of the Fallen 2009.
The Reveal
When my daughter saw herself in the mirror, she yelled, “Mom! I look like a real Transformer!” And that right there was the payoff for every blister, glue burn, and 2 a.m. craft-zone meltdown.
I picture her strutting down the driveway on Halloween night like she owns Cybertron, and me standing behind her, proud, exhausted, and while I'm 87% sure that she'll get tired, take it off and have me carry it for her most of the night, I'm so happy that I took the time to make this with her and for her. I know from having two older boys, that time with our babies flies by way too fast and even though I try to make every holiday magical, I've never made a DIY Halloween costume until this one. I feel like even when she outgrows this costume or Halloween in general, she'll still have these memories with her mom, just like I have similar memories with my mom.
The Photos
Scroll down for printable templates, some close-ups of each panel, and that sweet Bumblebee-yellow finish.

What I Learned
Hot glue is a love language.
When in doubt, use duct tape.
Vinyl wrap has trust issues.
Moms are basically engineers when their kids believe in magic.
If you’re planning to make your own DIY Transformer costume, grab some cardboard, check out my YouTube tutorial, and prepare to become one with your glue gun. Because Halloween might last one night — but the memories (and the duct tape residue) last forever.
Here's a printable list of materials. Click the button to purchase all of the materials from my Lowe's Storefront. I make a small percentage of commissions from each sale to help support my family and community.

ENJOY THESE FREE PRINTABLES:


Thank you so much for reading my blogs and visiting my site. I love to connect with people so feel free to leave a comment or ask any questions you have. You can also follow me on my Instagram page and DM me directly there.


Comments